Using Graphs and Changing Colors
These instructions are for using my project that use graphs and are in single or double crochet.
copyright 2001 Vicki Becker

When you crochet a motif or design you usually follow a graph. You change colors according to the graph.
To change color in single or double crochet you always work the last two loops on the hook off with the new color.
For single crochet, pull up a loop in the current color you are using, then draw the new color through the last two loops on the hook to complete the single crochet.
For double crochet, yarn over, pull up a loop in the current color you are using, draw through two loops, then draw the new color through the last two loops on the hook to complete the double crochet.
Practice
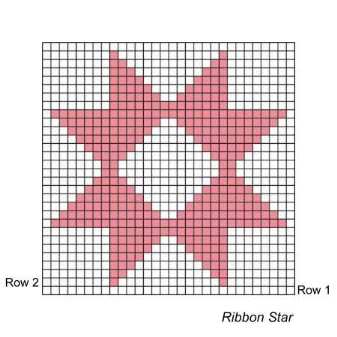
Lets use the Ribbon Star graph for practice to make sure you understand how to change colors.
The graph is read from right to left on row 1 and left to right for row 2 and so on. Start at the bottom of the graph for row 1 and work up.
I never carry a color more than two stitches and when I do carry a color I crochet over the unused yarn as I work. This makes your work reversible. There are never any loose strands of yarn on the wrong side of your project.
Sometimes a dark color that has been crocheted over will show through a light color, keep this in mind when deciding when to carry a color or drop it.
It is better to use separate balls or bobbins of yarn for each colored section even if at first you would be crocheting over only one or two stitches. Using the Ribbon Star graph as an example you start out with white, add rose for the first tip of the star, then add a bobbin of white for the middle section, another rose bobbin for the second tip of the star and lastly a white bobbin to finish the row.
Always remember to leave a long enough tail to weave in later when adding a new color or cutting an unused color.
Wind some bobbins with rose and white before you begin.
Row 1: With white ch 32, dc in 4th ch from hook and in each ch across (30 sts)
Row 2: (front side) Ch 3, turn (ch 3 counts as first dc) dc in
 7 dc, finishing off the last two loops with rose. Do not cut the
white yarn just let it drop to the back of your work. With rose dc
the next st, finishing off the last two loops with a new bobbin of white.
Dc 12 stitches with white, finishing off the last two loops with a new
bobbin of rose, letting the white yarn drop to the back of your work. Dc
the next stitch with rose, finish off the last two loops of this stitch
with a new bobbin of white and dc to the end of the row.
7 dc, finishing off the last two loops with rose. Do not cut the
white yarn just let it drop to the back of your work. With rose dc
the next st, finishing off the last two loops with a new bobbin of white.
Dc 12 stitches with white, finishing off the last two loops with a new
bobbin of rose, letting the white yarn drop to the back of your work. Dc
the next stitch with rose, finish off the last two loops of this stitch
with a new bobbin of white and dc to the end of the row.
Row 3: (back side) Ch 3, turn (ch 3 counts as first dc) dc in 7 dc, finishing off the last two loops with rose. Pick up the rose yarn that you dropped in the previous row.
NOTE: The yarn you are picking up will be on the side facing you now, this is the back side of your project. When you drop these colors drop them to the front of your work. Always keep the colors you are carrying on this side of your project.
Dc the next 2 sts with rose, finishing off the last two loops with the white dropped in the previous row. Dc with white in the next 10 stitches, finishing off the last two loops with the rose from the previous row.
NOTE: You will notice that the rose color will cross diagonally in front of a white dc in the previous row, crochet over the rose yarn to conceal it.
 Dc
the next 2 sts with rose, finishing off the last two loops with the white
dropped in the previous row. Dc the next 8 sts with the white to
finish the row.
Dc
the next 2 sts with rose, finishing off the last two loops with the white
dropped in the previous row. Dc the next 8 sts with the white to
finish the row.
Continue the remaining rows in the same manner.
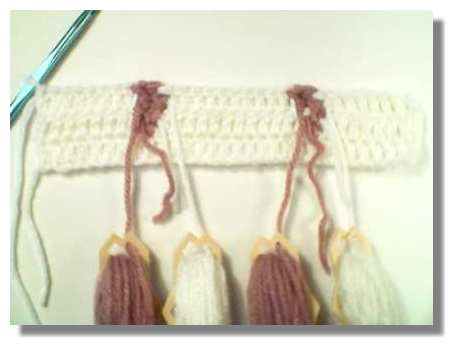
This is how the back side of your piece will look after you have completed the third row.